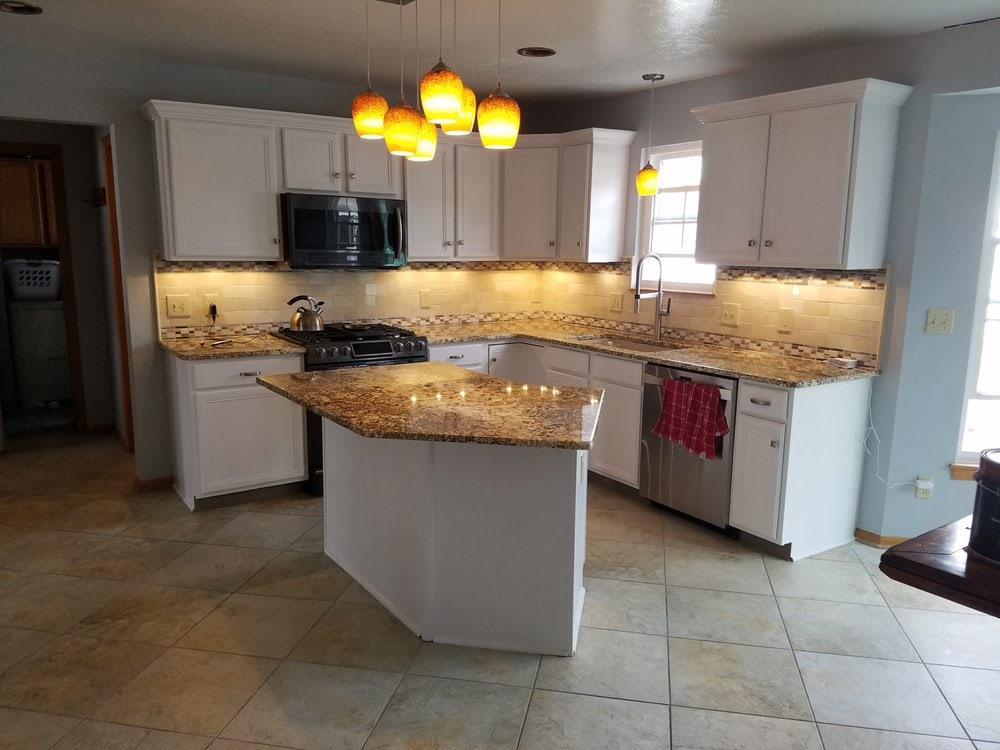
Kitchen cabinet painting is a rewarding home improvement project, allowing you to put a fresh coat on your cabinets. A new and fresh color brightens your kitchen cabinets and gives them an updated look.
Kitchen cabinet painting is an excellent way to improve your kitchen’s aesthetics, décor, and function, leading to increased home value. Your cabinets will look new, fresh, and attractive when done correctly. Besides, painting your kitchen cabinets can save you a lot of money in the long run because installing new cabinets is relatively expensive.
However, kitchen cabinet painting as a DIY project is time-consuming because most kitchens have a high gloss topcoat, such as polyurethane, oil paint, or high gloss latex paint. Therefore, a fresh layer does not stick to the existing coat.
Kitchen cabinet painting without sanding is even more daunting because you will need gloss remover to remove varnish from them. Likewise, you will prime your cabinets to ensure the new paint sticks on the surface. Follow the step-by-step process below to achieve your DIY kitchen cabinet painting goal. Read on!
Step 1: Remove the Cabinet Doors and Drawers
Pull out your cabinets’ drawers and place them somewhere safe. It is essential to remove drawers from the unit’s inside tracks. Avoid pulling the entire path to ensure you don’t damage the unit. Sometimes, it is daunting to remove drawers from the cabinet. If this is the case, leave the drawers in the frame.
Remove the hardware and hinges from the drawers and doors using a quality drill. Remove the screws from the hinges and keep them in an organized way. For instance, you can organize the screws by location and size. Unscrewing the hardware requires you to flip the cabinet doors on their back. Keep the items, including handles, pulls, and screws, somewhere safe if you intend to reuse them.
Take the shelves out of your kitchen cabinets. Remember that some cabinets have built-in shelves, making them irremovable because no brackets hold them up. In that case, you will have to leave the shelves and paint them later.
Step 2: Clean your Kitchen Cabinets Before Painting
Cleaning your kitchen cabinets is an essential step that requires you to apply a degreaser to the frames and doors. We recommend using a quality scrubbing sponge for this purpose. Likewise, use the sponge to scrub shelves, drawers, and other components. Make sure you remove the accumulated dirt, dust, and grime.
Remember, too much scrubbing can cause scratches on the wood, leading to a dull spot. Use a wet cloth to wipe down and rinse your cabinets’ components. You can do this by soaking a clean, soft cloth in water and using it to clean off the doors, drawers, frames, and shelves. Avoid using soap or detergent when soaking the fabric in water.
Make sure you clean places that are difficult to reach, such as the cabinets’ undersides and corners. If you notice any signs of degreaser on the components, clean them thoroughly. The water will take at least 60-90 minutes to dry. However, you can use a fan to accelerate the drying process.
Take the drawers and doors to a ventilated area, put on gloves, and use a clean cloth to apply the de-glosser. Make sure you rub the product on the fronts, backs of the door, and drawers.
Apply the de-glosser to the frames if they are dirty. Avoid applying the product indoors because it can harm your health. The fumes are potent enough to cause respiratory diseases. Therefore, you have to act carefully. The de-grosser will dry within 30-50 minutes.

Step 3: Apply the Primer to your Kitchen Cabinets
Before you apply the primer, make sure the de-glosser has completely dried. We recommend using a quality medium bristle brush and foam roller for painting the primer on the doors and drawer fronts. After applying the primer to the drawers and doors, apply a coat of paint to the frames but make sure the primer has dried.
Let the front of the doors dry for 30 minutes, and use the brush to apply a light layer of primer to the drawers’ backs. Wait for two hours to ensure the primer dries on the fronts and backs. Remember, using the primer on the doors and drawers within 60 minutes after the de-glosser dries is the best practice.
Step 4: Apply a coat of Cabinet Enamel
You can use a foam roller to paint the backs of the drawers and doors because cabinets usually have flat surfaces. Use a fine brush to go over the paint layer to prevent bubble formation, and wait for at least 4-5 hours before applying the paint to the fronts.
Instead of painting the interior parts of the drawers, you can paint the sides because they are the only visible components when you pull the drawers out. If your cabinets have molding on the front doors, we recommend using the brush bristles to coat hard-to-reach areas. You can also use a small paintbrush for intricate molding or details. Observe your work to ensure you did not leave small corners.
Step 5: Apply a Coat to the Flat Surfaces
Once you have painted the molding, the next step is to apply a coat to the flat surfaces, including the shelves’ fronts and backs. Use a fine bristle brush to cover the paint to prevent bubble formation. Use the brush to balance the thicker areas of paint. You can always smooth the surface with a quality foam roller. Using enamel will stay open longer to minimize brush marks.
You must keep the drawers and doors in a ventilated area, especially when applying a layer of paint. The purpose is to accelerate the process and protect yourself from harmful fumes. Kitchen cabinet painting as a DIY project requires careful planning and preparation, including safety precautions. Remember, safety comes first.
Step 6: Paint the Cabinet Frames and Shelves
Use a foam roller to paint the frames while the drawers and doors dry. Use a fine bristle brush to go back over the paint and remove air bubbles. Spread out thicker areas to achieve a good finish. You can also use a fine brush to paint tight corners and junctions.
Experts recommend working in sections, primarily when you paint the frames, because these are larger areas. For instance, use the roller to paint a section and the fine brush to go over the area. That way, you can avoid complications and achieve your goal.
Step 7: Apply a Second Coat of Paint
Applying a second coat of paint to your kitchen cabinet is an excellent way to achieve more coverage and brighter color. However, you must wait for at least 4-5 hours, allowing the first coat to dry completely. Apply a second coat to the frames and doors, and make sure you apply the “one-section and brush” principle to achieve an even coat.
If your cabinets’ existing color is dark and you want to apply a lighter color, we recommend using at least two coats. That way, you can cover the visibility of the darker color and prevent it from showing through the lighter paint. Once done, wait for at least 24 hours to ensure the paint dries completely.
Step 8: Reattach the Hardware
Once the paint has completely dried, it is time to put back the hardware on your cabinets’ drawers and doors. Putting the hardware on before 24 hours can lead to complications, such as scratches and dents.
Therefore, you must wait and stay patient for 24 hours, allowing the paint to dry. Use a screwdriver to reattach the hardware on the doors and drawers. The purpose is to prevent dents and chips in color.
Position each drawer and door accurately and ensure they align with their respective hinges. Screw the hinges into the frames and onto the doors. Check the doors to ensure you open and close them smoothly.
Final Words
Kitchen cabinet painting as a DIY project is an easy, quick, and cost-effective way to remodel your kitchen. However, many homeowners find it challenging to paint their kitchen cabinets accurately, especially when they do it without sanding. Follow the step-by-step process above to paint your kitchen cabinets without making mistakes. (always follow the specs for the products you are using; they may differ)
Although kitchen cabinet painting as a DIY project is a good idea, if you are unsure about it, we recommend hiring a professional painting contractor, like The Picky Painters, to get the job done accurately, professionally, and affordably.
Contact us today for more info!
FAQ
Q1: Is it really possible to skip sanding without ruining the finish?
Yes—newer bonding primers and deglossers can grip onto glossy cabinet surfaces so paint adheres well. Sanding is the “old-school insurance,” but these modern products let you save time while still getting lasting results.
Q2: What’s the biggest mistake people make when painting without sanding?
They skip the deep clean. Grease, dust, and cooking residue are invisible enemies; even the best primer will peel if the surface isn’t spotless first. Cleaning is the new sanding.
Q3: Will painted, unsanded cabinets actually hold up in a busy kitchen?
If prepped right—cleaned, primed with a bonding primer, and sealed with a protective topcoat—they can last for years. The secret is less about sanding and more about patience with each layer.
